
Once upon a time we lived in a world where Mod Podge didn’t exist (to us). It was very sad and full of woe and all we had were run-of-the-mill plain-old carved pumpkins. The End. Luckily for us, this story has a happy ending! Crafters, we’d like to introduce you to Brown Paper Packages. It’s okay—we’ll wait while you dry off the drool that’s running down your chin. Kierste and Angela are some crafty, crafty ladies, and from the moment we first laid eyes on their blog we’ve been itching to get our hands on some of their ideas.
With Halloween just around the corner, it was time to make the annual trip to the pumpkin patch to pick out a bright orange beauty to grace our home this year. And also, to take adorable pictures of a pretty cute baby frolicking amongst nature’s autumnal bounty:

You’re welcome for that.
At any rate, once we got our picks home, it was time to make a game-time decision. To carve or not to carve? While the traditional route is good, messy fun I wanted to do something a little different this year. And once I saw the monogrammed pumpkins on Brown Paper Packages the decision was an easy one to make.
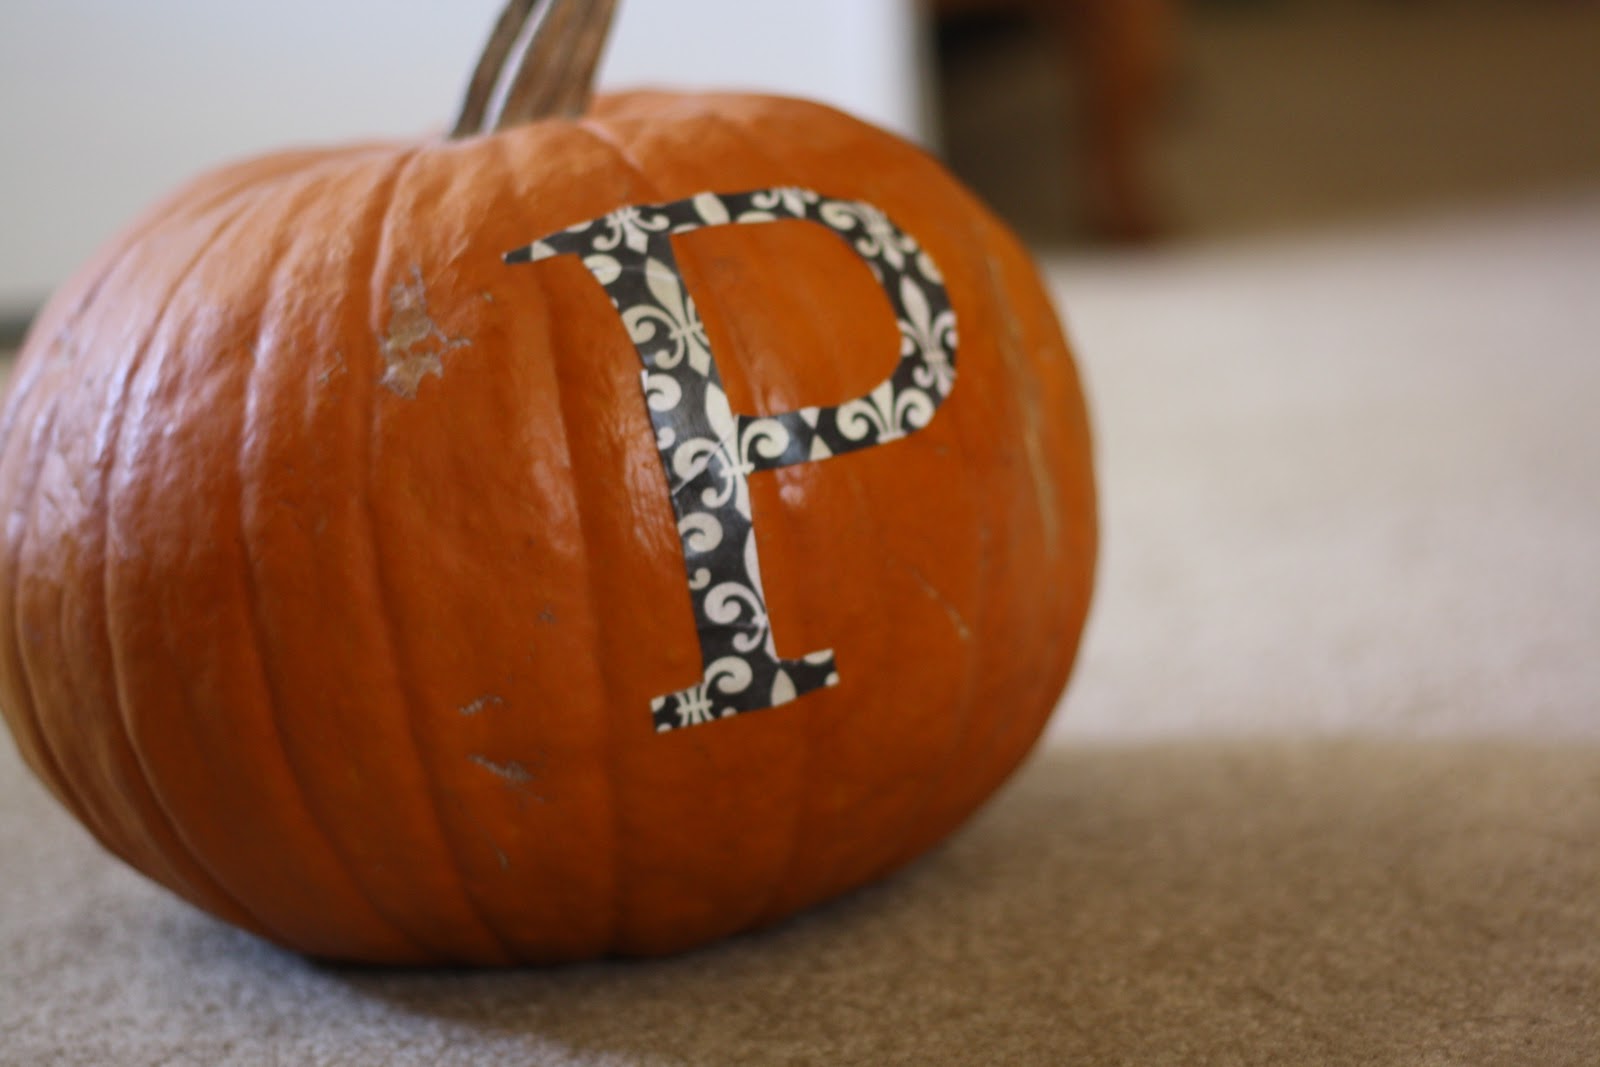
The first step was to decide what we wanted to go on our pumpkins and to create a stencil on the computer. I opted for a “P”, which is the initial of our last name, and a lowercase “a” on the baby pumpkin that we picked for our daughter Addie. Using Microsoft word I found a font that I liked, blew it up to the size I wanted and then printed and cut out the letters. Here is what the “P” looked like hot off the presses:

Using the stencil as a guide, I cut out the letters onto scrapbook paper (that I already had on hand—score!). They were a little rough around the edges, but it’s okay. Trust me.

Now, this next step required another crafting “first” for me. Internet, it was my maiden Mod Podge voyage.

Now, this next step required another crafting “first” for me. Internet, it was my maiden Mod Podge voyage.

I put a layer of Mod Podge on my pumpkins in the place I wanted to position my monograms and then carefully placed on the cut-out letters. Here is the only tricky part: Just be careful that your letters lay flat and don’t have any folds or bubbles in them. The Mod Podge is pretty sticky and once your paper is on--it’s on. Since I am both new to this and impatient, I ran into this issue a couple of times. I was able to smooth the places out with my finger and it looks okay. If you are a perfectionist about that kind of stuff, then you may want to watch out.
Once the letters were in place, we painted on another layer of Mod Podge to seal our monograms in.

Now, if I hadn’t seen the results of this stuff elsewhere I may have gotten a little nervous at this step. The layer of white glue-like goo was not the look I had in mind, so it was comforting to know for sure that it would eventually dry clear.
And after we let them dry all night- voila! Adorable, easy-peasy monogrammed pumpkins. I loved them so much that I couldn’t bear to banish them out to the porch where I couldn’t look at them all the time, so they now sit on their place of honor on the hearth of our fireplace:

And Miss Addie was a big fan of her “A” pumpkin as well.

I love them. A lot. So easy—even a copy cat can do it!
And if fresh pumpkins aren’t really your thing—we’re pretty sure this would work just as great on the fake pumpkins you can buy at your local craft store. Which means you can use them year after year! (And here’s a hint: those pumpkins should be going on clearance soon if they aren't already!)
And if fresh pumpkins aren’t really your thing—we’re pretty sure this would work just as great on the fake pumpkins you can buy at your local craft store. Which means you can use them year after year! (And here’s a hint: those pumpkins should be going on clearance soon if they aren't already!)
Here’s The Copy Cat Rundown:
Total Cost: Pumpkins from local church’s pumpkin patch:-$8 Mod Podge: $5.99 (but I have lots and lots left for future crafting) Scrap book paper: $0.60- and we still have scraps to use another time Sponge brush: $0.99 (but we washed it out and plan to re-use it)
Total Time: Not including the overnight drying time (or the technical difficulties I had with my printer)- 15 minutes
Would we do this craft again?: Absolutely. It was easy, cost effective, and adorable. No pumpkin is safe!
Credit: Brown Paper Packages get 100% of the credit. I’m sure this isn’t the last time you’ll see these girls taking credit at the Copy Cat finish line.
Check back tomorrow for Natalie’s paper pumpkin delights. You’re gonna love them—and maybe even want to copy cat a few of you own.
Thanks for the idea! Our family pumpkins turned out great... check them out on the blog. :)
ReplyDelete